Fixing HDR Chromatic Aberration
Posted by By Jim at 19 September, at 22 : 15 PM Print
Warning: count(): Parameter must be an array or an object that implements Countable in /home/thefot6/public_html/wp-content/themes/Video/single_blog.php on line 46
Warning: count(): Parameter must be an array or an object that implements Countable in /home/thefot6/public_html/wp-content/themes/Video/single_blog.php on line 56
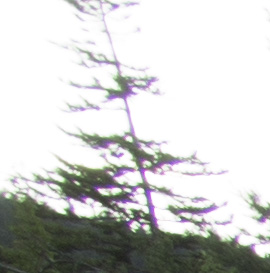
Chromatic Aberration – purple fringe
I recently had a reader that wrote in and was frustrated with the level of chromatic aberration (sometimes abbreviated as “CA”) that he was getting in his final images with Photomatix. Chromatic aberration is the color fringing that appears around the edges of objects, especially when you have a dark object surrounded by a lighter object, like the leaves of a tree against the sky. This fringe tends to be greater with less expensive lenses and with wide angle lenses. Unfortunately, the HDR process, which can enhance detail in an image, also enhances bad things like sensor noise and CA.
There is a way you can reduce, if not eliminate, CA in your final HDR image regardless of which program you choose to merge the HDR sequence. The secret is to first bring the sequence of images into Adobe Camera RAW (ACR) with Bridge, Lightroom, or Photoshop. You will want to select all the images from the HDR sequence to bring them into ACR. For example, in Lightroom, you can hold down the control key and click-select each image, or simply click on the first image and hold down the shift key and click on the last image which should highlight them all. Then go to the “Develop” tab in Lightroom.
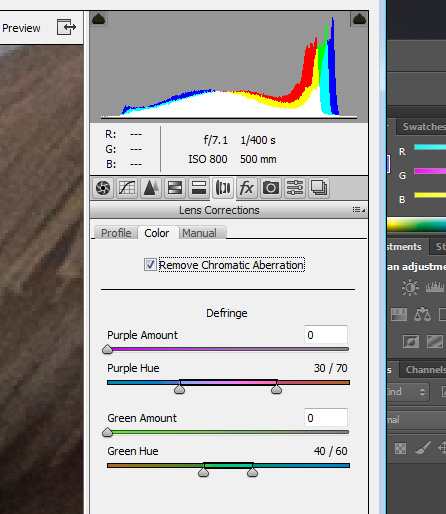
Within the ACR program, there is a tab for “lens correction”. Click on this and you will be presented with sliders under DeFringe marked “Fix Red/Cyan Fringe” and “Fix Blue/Yellow Fringe” in older versions of ACRl There is also a drop-down list, and you will want to make sure to select “all edges”. Under the newest version (I’m using 7.1), there are four slides which read “Purple Amount”, “Purple Hue”, “Green Amount” and “Green Hue”. There is also a check box for “Remove Chromatic Aberration” that should be checked. In Lightroom, these same options are under the “Lens Correction” tab in Develop mode.
Before you begin to manipulate the sliders, zoom in to a part of the first image that displays CA about 200-300%. You then want to manipulate the Fringe sliders to reduce or remove the fringing. Work carefully with each slider. In the newer version of ACR, you can adjust the lower sliders to control to adjust the range of the hue that you want to reduce. Note that these adjustments are global and effect the entire image. In the newer versions of ACR, you can use the adjustment brush to apply the adjustments locally.
When you are satisfied with the results, use the “select all” button in the upper left corner of the ACR window and while pressing the Alt key, click “Synchronize” This will apply the same setting to all the entire sequence of images that are currently in ACR.
Finally, save the images using the button in the lower left window of ACR and select a folder on your computer. Save them with the TIFF image format. If you are using Lightroom, you can just export the entire sequence, with the ACR adjustment, into your favorite HDR program after copying and pasting the RAW adjustments to each image in the sequence.
Otherwise, you can bring those TIFF images into Photomatix, or whatever program you prefer to use, and make sure to uncheck the option to reduce chromatic aberration as you have just done that step with ACR! The CA reduction in Photomatix just doesn’t work all that well yet.
This process requires a few extra steps, but I think you will be pleased with the results. You can use this same process on non-HDR images that display excessive CA as well!